So, you’ve decided to dive into the world of electrical wiring? Good move! Testing electrical wires might sound intimidating, but trust me, it’s not as scary as it seems. Whether you’re a DIY enthusiast or just curious about electrical safety, learning how to test electrical wires is a skill that can save you time, money, and even prevent accidents. This guide will walk you through everything you need to know, step by step. Let’s get started, shall we?
Before we jump into the nitty-gritty, let’s talk about why testing electrical wires is so important. Imagine this: you’re working on a project, and suddenly, you hear a spark or worse, see smoke. That’s not something you want to deal with, right? By learning how to test electrical wires properly, you’re not only protecting yourself but also ensuring the safety of your home or workspace.
And hey, don’t worry if you’re a complete beginner. This guide is designed to be easy to follow, even for those who’ve never touched a wire in their life. We’ll cover all the basics, including the tools you’ll need, safety precautions, and step-by-step instructions. By the end of this, you’ll be testing electrical wires like a pro!
Why Testing Electrical Wires Matters
Alright, let’s break it down. Testing electrical wires isn’t just about curiosity; it’s about safety. Electrical accidents are no joke, and they can happen to anyone, anytime. According to the Electrical Safety Foundation International (ESFI), electrical failures or malfunctions are responsible for over 45,000 home fires each year. That’s a pretty compelling reason to learn how to test electrical wires, don’t you think?
But it’s not all doom and gloom. By testing your wires regularly, you can catch potential issues before they become serious problems. Whether it’s a frayed wire, a loose connection, or a faulty circuit, early detection can save you a ton of hassle. Plus, it’s a great way to ensure that your electrical system is up to code and functioning as it should.
Common Electrical Hazards to Watch Out For
Let’s talk about some common hazards that you might encounter when working with electrical wires. These are things you definitely want to avoid:
- Overloaded circuits: Too many appliances on one circuit can lead to overheating and even fires.
- Frayed or damaged wires: Wires that are worn out or damaged can cause short circuits and sparks.
- Improper grounding: If your electrical system isn’t grounded properly, it can lead to electrical shocks or worse.
- Loose connections: These can cause intermittent power outages or even start a fire.
Now that you know what to look out for, let’s move on to the tools you’ll need to test electrical wires safely and effectively.
Tools You’ll Need to Test Electrical Wires
Before you start testing electrical wires, you’ll need to gather a few essential tools. These aren’t just random gadgets; they’re specifically designed to help you test wires safely and accurately. Here’s what you’ll need:
- Multimeter: This is your go-to tool for testing voltage, resistance, and continuity. It’s like the Swiss Army knife of electrical testing.
- Non-contact voltage tester: This handy tool allows you to detect voltage without touching the wire, making it super safe and convenient.
- Wire strippers: You’ll need these to strip the insulation off wires when necessary. Just be careful not to damage the wire itself!
- Screwdrivers: Both flathead and Phillips are essential for opening up electrical boxes and panels.
- Protective gear: This includes gloves, safety glasses, and even a helmet if you’re working in tight spaces.
Having the right tools is half the battle. Once you’ve got everything ready, it’s time to dive into the actual testing process.
Choosing the Right Multimeter
Not all multimeters are created equal. When choosing a multimeter for testing electrical wires, look for one that’s durable, accurate, and easy to use. Digital multimeters are generally preferred because they provide precise readings, but analog ones can work too if you’re on a budget.
Pro tip: Invest in a multimeter with an auto-ranging feature. This means you won’t have to manually set the range every time you take a reading, saving you time and effort.
Understanding Electrical Basics
Before you start testing electrical wires, it’s important to have a basic understanding of how electricity works. Don’t worry, I won’t get too technical here. Just think of electricity as water flowing through pipes. Voltage is like water pressure, current is like the flow rate, and resistance is like the size of the pipe.
Here’s a quick rundown of the key terms you’ll need to know:
- Voltage: The electrical potential difference between two points.
- Current: The flow of electrical charge through a conductor.
- Resistance: The opposition to the flow of current.
Understanding these basics will help you interpret the readings you get from your multimeter and make informed decisions about your electrical system.
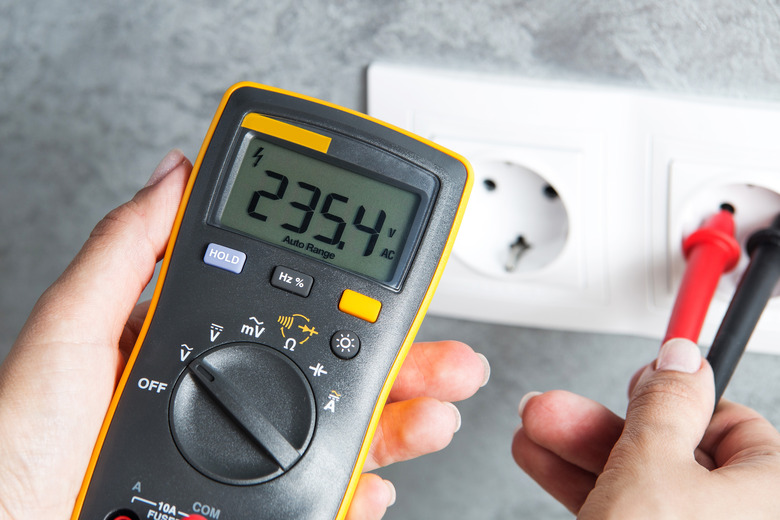
Testing for Voltage
Testing for voltage is one of the most important steps in checking electrical wires. Here’s how you do it:
- Turn off the power to the circuit you’re testing. Safety first, folks!
- Set your multimeter to the voltage setting. Make sure it’s set to AC voltage if you’re testing household wiring.
- Touch the probes to the terminals or wires you’re testing. Be careful not to touch any metal parts with your hands.
- Read the voltage on the display. If it shows a reading close to the expected voltage (e.g., 120V for most household circuits), the wire is live.
Simple, right? Just remember to double-check your settings and never assume a wire is dead unless you’ve tested it.
Safety Precautions When Testing Electrical Wires
Safety should always be your top priority when working with electricity. Here are a few tips to keep you safe while testing electrical wires:
- Always turn off the power to the circuit you’re working on. This might seem obvious, but it’s easy to forget in the heat of the moment.
- Use protective gear, including gloves and safety glasses. These will protect you from shocks and debris.
- Double-check your tools before use. Make sure your multimeter and other equipment are in good working condition.
- Work in a dry environment. Water and electricity don’t mix, so avoid working in wet conditions at all costs.
Remember, safety isn’t just about protecting yourself; it’s about protecting those around you too. If you’re ever in doubt, don’t hesitate to call in a professional.
What to Do If You Get Shocked
Despite your best efforts, accidents can happen. If you ever get shocked while testing electrical wires, here’s what you should do:
- Move away from the source of the shock as quickly as possible.
- Seek medical attention immediately, even if you feel fine. Electrical shocks can cause internal damage that isn’t immediately apparent.
- Report the incident to the appropriate authorities, especially if it happened at work.
It’s better to be safe than sorry, so always err on the side of caution.
Step-by-Step Guide to Testing Electrical Wires
Now that you’ve got all the basics down, let’s walk through a step-by-step guide to testing electrical wires. This will cover everything from preparation to final testing:
Step 1: Prepare Your Workspace
Start by clearing the area around the electrical box or panel you’ll be working on. Make sure there’s enough space to move around comfortably and that all tools are within reach. Also, ensure that the area is well-lit so you can see what you’re doing.
Step 2: Turn Off the Power
This is a crucial step. Locate the circuit breaker for the circuit you’re testing and turn it off. Use a non-contact voltage tester to confirm that the power is indeed off before proceeding.
Step 3: Set Up Your Multimeter
Set your multimeter to the appropriate setting for the test you’re performing. For voltage testing, set it to AC voltage. For continuity testing, set it to the continuity setting.
Step 4: Test the Wires
Follow the steps outlined earlier to test the wires for voltage, resistance, or continuity. Take detailed notes of your readings so you can refer back to them later.
Step 5: Analyze the Results
Once you’ve completed your tests, analyze the results to determine if there are any issues with the wires. If you’re unsure about what the readings mean, consult a professional or do further research.
Troubleshooting Common Issues
Even with careful testing, you might encounter some common issues with electrical wires. Here’s how to troubleshoot them:
- No voltage reading: This could indicate a broken wire or a faulty connection. Check the connections and replace the wire if necessary.
- High resistance: This might mean there’s a problem with the wire or the connections. Inspect the wire for damage and tighten any loose connections.
- Intermittent power: This could be caused by a loose connection or a faulty switch. Check all connections and replace any damaged components.
By addressing these issues early, you can prevent them from becoming bigger problems down the line.
When to Call a Professional
There are times when it’s best to leave electrical work to the professionals. If you encounter any of the following situations, don’t hesitate to call in an expert:
- Complex wiring issues that you’re not familiar with.
- Persistent problems that you can’t seem to fix.
- Safety concerns that you’re unsure how to address.
Your safety is always the top priority, so don’t be afraid to ask for help when you need it.
Conclusion: Mastering the Art of Testing Electrical Wires
And there you have it, folks! Testing electrical wires might seem daunting at first, but with the right tools, knowledge, and safety precautions, it’s a skill that anyone can master. By following the steps outlined in this guide, you’ll be able to test electrical wires with confidence and ensure the safety of your home or workspace.
Remember, the key to successful electrical testing is preparation, patience, and attention to detail. Don’t rush through the process, and always prioritize safety. If you ever feel unsure or uncomfortable, don’t hesitate to call in a professional.
Now that you’ve learned how to test electrical wires, why not share this guide with your friends and family? Spread the knowledge and help others stay safe. And if you have any questions or feedback, feel free to leave a comment below. Happy testing, and stay safe out there!
Table of Contents
How to Test Electrical Wires: A Comprehensive Guide for Beginners
Why Testing Electrical Wires Matters
Common Electrical Hazards to Watch Out For
Tools You’ll Need to Test Electrical Wires
Understanding Electrical Basics
Safety Precautions When Testing Electrical Wires
Step-by-Step Guide to Testing Electrical Wires
Conclusion: Mastering the Art of Testing Electrical Wires